Wednesday, 5 April 2017

How to calculate think time?

Few parameters needs to be considered before you start the performance test and think time is among those. In most of the cases, it has been overlooked and passed as random number based on the preconceived notion of the employees associated with that particular organization. 

What is think time?

Think Time is the time that the real user waits between actions or transactions. Let's say, the user has performed a search operation, and the corresponding results are displayed in the application, so now the user needs to perform another action and the time taken by the real user to think and implement the action is termed as the think time.


Where to add Think time?


Let’s assume, If you are placing think time on each and every request – This approach is not realistic as the virtual user is not imitating the real user behavior. If a user performs a search operation, so there will be multiple requests executed at the back end so adding think times to all those requests corresponding to a single user action is certainly not a good approach, it will look something like:


Think time should not be added at the request level, Indeed it must be added at the user action or transaction level


Does think time affects TPS?

The answer is Yes, think time is one of the parameter’s that will impact the Transactions per second, Let’s see how..

Let’s consider the following three scenario’s
Scenario 1 : 900 users with 30 seconds of think time
Scenario 2 : 900 users with 15 seconds of think time
Scenario 3: 900 users with 10 seconds of think time

And here you go with the little’s law:-

Users = Arrival Rate * (Response time + Think Time)

So, if you want to find the Arrival rate (alias TPS)

Arrival Rate = Users / (Response Time + Think Time)

Assuming, 5 seconds as an average response times

Scenario 1: Arrival rate = 900/(5+30) = 25.71 hits/sec
Scenario 2: Arrival rate = 900/(5+15) = 45 hits/sec
Scenario 3: Arrival rate = 900/(5+10) = 60 hits/sec

So, It’s pretty clear that think time plays a vital role in affecting the TPS. 


 How do you calculate think time?
  
TT =  (D – R)/T

TT = think time per transaction
D = Expected time taken by the real user to complete E2E scenario
R = Response time of the script with single user for E2E scenario 
T = Total number of transactions within the script

Let's consider a scenario for better understanding

Expected time to complete the scenario by real user (D) = 30 seconds
Time taken by virtual user to perform E2E scenario (R) = 5 seconds
Total number of transactions within the script (T)= 5

So, TT = (30-5)/5

Think time = 5 seconds

You can also validate the above calculation by the below technique:

Think time for a single transaction = 5 seconds
Think time for five transactions = 5 * 5 = 25 seconds (Consider)
Time taken by virtual user to perform e2e scenario = 5 seconds (Consider)

Therefore, a virtual user took 30 seconds to perform the entire scenario similar like a real user.
If you are going to use a constant think time it will act like as robotic timer and will not match like a real user, so it is advisable to take +/- 10% of the calculated think time. A good practice can be to consider a random think time considering minimum and maximum think time. 

You can use the below formula’s for the calculation.

Minimum think time = 0.9 X TT
Maximum think time = 1.1 X TT

Stay tuned for more posts!!!

Tuesday, 14 March 2017

Easy steps for JMeter - Jenkins Integration

Before, you start the integration process, define the following paths till /bin directory in the environment variables: 
  • JMeter
  • JDK
Once the above configurations are completed, you can proceed with the Jenkins setup as follows:

1. Download the jenkins.war file

2. Open command prompt, navigate till the Jenkins directory where you have placed the WAR file and type the command:- java -jar jenkins.war

Wait till the message appears on your cmd "Jenkins is fully up and running"


3. Open Browser, type localhost:8080, it will open up the default Jenkins dashboard


4. So now, we are going to create a job in Jenkins by clicking at "Create new jobs"

5. Now you need to enter a job name followed by the type of build, for demo purpose we are selecting a free style software project


Once you've successfully created a build, we will test it by running a JMeter script from Jenkins

How to give script path in Jenkins?

Go to build drop down menu, so based on your OS type choose make the selection, we are using Windows OS so we have selected Execute Windows Batch Command


Once the Windows batch command prompt opens, type the following command: 
jmeter -n -t <script path> -l <results path>

Now, you can save the build and proceed with testing :)

Stay tuned for more posts!!!

Monday, 20 February 2017

Getting started with Parameterization in Loadrunner

How to create a new script ?

Fileà New Script and Solution


Protocol selection:

Select a protocol based on the type of application, for generic web based applications; you can select Web – HTTP/HTML protocol. In case, you’re unaware of the type of protocol to be used for the recording purpose, you can take the help from the protocol advisor.

If you would like to test Web Services then you can use the corresponding web services protocol or if you want to connect to database then you can use the Oracle 2 – tier protocol, so depending upon the type of application, protocol is decided.


Before, you get started with the script recording, you must know the following three actions:-

vuser_init action contains all the requests corresponding to login transaction, basically this action part contains all the procedures that needs to be executed only once during the script initialization phase

vuser_end action contains all the requests corresponding to  logout transaction and contains procedures that will be executed once during the script completion phase i.e. in the end

Action contains rest other transactions that were part of the scenario

If you are running a script for multiple iterations, only the action would be executed multiple times whereas init and end section will be executed once.


Configuring the recording attributes

To start the recording, you need to select the type of action, that contains the procedure/request based on the scenario. If a scenario contains Login transaction, then the Recording type should be changed to vuser_init,  if you’re trying to record a logout transaction then recording type should be vuser_end.

In our scenario, we do not have any transaction that needs to be executed once so we’ll be using Action to record the entire scenario


Once you start the recording, the following window would appear and you can see the recording getting started on the right corner. You can add the transaction names by click on the highlighted button (that looks like timer)


For closing the transaction, refer the below snapshot:-


Same way you can keep on moving, by recording all the user actions based on the scenario just by changing the transaction names and recording the requests for that subsequent transaction.


After the recording is completed, the script would appear to be:


First thing, that needs to be done is, removing the irrelevant requests that has no relation with scenario

    web_url("iecompatviewlist.xml",
        "URL=https://iecvlist.microsoft.com/IE10/1152921505002013023/iecompatviewlist.xml",
        "Resource=0",
        "RecContentType=text/xml",
        "Referer=",
        "Snapshot=t2.inf",
        "Mode=HTML",
        LAST);


The end point URL has no reference with www. Blazedemo.com that we are trying to record so we can omit out these requests because it will lead the response times to increase


Next step will be parameterization:

Parameterization: It’s a process of managing the user input in order to facilitate it for multiple users or iterations.

So, you need to find the values which were entered by the end user in the application. Such as on the first page, the user selected the departure and the destination city.


In order to parameterize, follow the below procedure:-

Select the variable à Right Click and select Replace with Parameter à Create New Parameter


Assign a parameter name for the parameterized value:-


Same way, you can parameterize other values as well.

IMPORTANT: For an instance, you need to pass parameterized value in an ordered fashion such as; you want to pass Paris with Buenos Aires or London with Paris etc. so you need to follow different techniques during parameterization.

Let’s assume we need to pass Buenos Aires every time with Paris

Step 1.


Step 2. Assign the parameter name and click on properties

In Properties, select the file path for Paris i.e. parameter name of Paris (p_fromPort)


Step 3.

Once you have selected the File Path as p_fromPort.dat, Click on Add Column and click OK

Now, you can see that you have merged p_fromPort with p_toPort


You can also edit the notepad and add other parameters to that file using Comma “,” as a delimiter


Similar way, you can parameterize other values within the script


Stay tuned for more posts!!!


Getting started with Parameterization in Jmeter

Test plan: Consists of series of steps that the end user is trying to perform, and jmeter will reproduce the same with virtual users. Test plan contains one or more thread groups, logic controllers,  listners, assertions, timers etc. Below snapshot represents the structure for adding the elements to the test plan:


Workbench: Provides  temporary storage for the elements, the elements that are added to the workbench are used for the recording purpose.


Note: Test Plan is also known as permanent storage because the elements which are added to the test plan are saved permanently and can be accessed anytime in future whereas workbench provides temporary storage, elements added to it will be vanished once the script is closed.

Thread group: The first step is to add the thread group to the test plan, all the elements such as logic controllers, sampler, timers etc. are added under the thread group, so consider the thread group  as a parent and it’s elements as child. Following items are controlled using thread group:

  • Assigning number of users for executions
  • Setting up the ramp up time
  • Controlling the loop count so as to run the script for specific number of iterations
  • Setting up the duration of the test


How to add thread group:

Right Click Test Plan àAdd à Threads (User) à Thread group


Transaction controller: Contains the user actions performed during the recording phase. When the script is recorded, it captures the traffic in the form of http requests, so these requests are placed within individual transaction controllers.

Let’s say, you hit the home page  www.blazedemo.com , requests corresponding to the homepage transaction will be placed inside home page transaction, followed by clicking on find flights, so corresponding requests would be placed inside another transaction named ClickFindFlights. Likewise you can have multiple transactions based on the scenario.

How to add transaction controller:

Right click Thread group àAdd àLogic Controller àTransaction controller


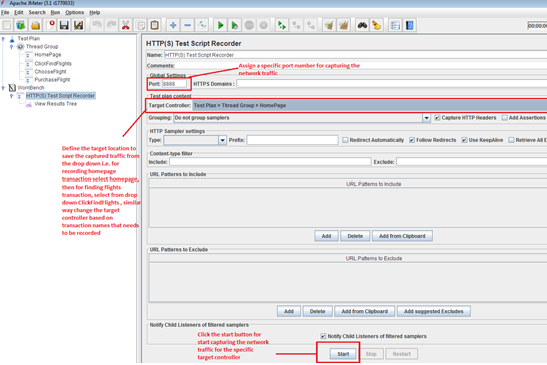
HTTP(S) Test Script Recorder: In order to capture the network traffic for your scenario, add this element inside work bench and define the port number for which it will capture the traffic and the same port number should be assigned to the browser proxy settings as well


At browser level, change the proxy settings: Browser àSettings àProxy


After completing the above settings, you are good to start the script recording.
Step 1: Change the target controller to point to HomePage transaction


Steps 2: Enter www.blazedemo.com  in the browser


On the left, we have selected HomePage as target controller and on the right the recording events are captured in the home page transaction controller. So whatever you will be navigating in the browser you will be able to capture it within transaction controller


Follow step 1 and step 2 for recording other transactions as well


Step 1: Change Target Controller to Click Find Flights


Step 2: In Browser, Click the Find flights button


On the left, we have selected ClickFindFlights as target controller and on the right the recorded events are captured in the ClickFindFlights transaction controller


Same way you can record the other transactions as well and after recording the entire scenario, the test plan would look like:-


While doing a performance test, we generally omit out .css/.js/.ico/jpeg/.png files, so can comment out those requests from our script based on the requirement


Next step will be the parameterization:

Parameterization: It’s a process of managing the user input in order to facilitate it for multiple users or iterations.
So, you need to find the values which were entered by the end user in the application. Such as on the first page, the user selected the departure and the destination city.


Now you have to parameterize the city. For this, you will be using 'CSV Data Set Config'.

Click on Thread group-> Add->Config Element->CSV Data Set Config.

You need to place the CSV Data Set Config at the top of the thread group. Next step will be to configure the CSV Data Set Config.

Filename: Enter the .csv filename along with the entire file path, but, In case,  the .csv file and the script are placed in the same directory/path then you can directly give the csv file name. In this case, we have placed both script and .csv file in the same directory so we have just mentioned City.csv

Variable Names: These are the reference for the values that are placed in the csv file. So, the departure city will be referenced by p_DepartureCity and Destination city will be referenced by p_DestinationCity


CSV Data Set Config Element:


You can also correlate these cities but for now, you can parameterize them. For parameterization, you have to create a csv file and need to place the city names in it with comma “,” as a delimiter


Now go to the parameter that has the static value in the script and replace that parameter value with ${variable_name }


Same way, parameterization will be done for all other user inputs across the script.

Stay tuned for more posts!!!


Wednesday, 15 February 2017

Performance Center compilation error - File Path/Directory not found


At times, you would have faced challenges with scenario's that consists of uploading a document from a shared drive, even though that document exists still the Performance Center console gives an error that "File Path/Directory not found".

Problem:- When you would have tried to execute the script through Vugen, it would be working fine with multiple iterations but when it comes to PC it doesn't compiles due to file/directory not found error.
Cause:- Possibly, the shared drive(Directory) has a firewall enabled that allows only the admin or the users with admin privileges to access that particular path

So, when you  are trying to execute the script through Vugen, it's running locally on your machine and it doesn't needs special privileges to access the directory because your LANID/user ID, does have the privileges to access that particular file path/directory.

But, when virtual users are trying to access the directory through Controller/Performance Center, they are not having privileges to access that directory because they are trying to access it with help of agents (magentservice.exe or magentproc.exe).

There are various ways of resolving this issue:-

1. You can upload the document within the Loadrunner script, so there will be no issues related with the file path/directory as it will be stored inside the script itself


2. In case, there are multiple documents that needs to uploaded then you need to grant admin privileges to the agent, you can do that by following the below steps.

a) open Services.msc 
b) Search for Performance Center Load testing service 
c) right click and properties 
d) click on Log on tab
e) click "This Account" radio button and enter credentials, the below credentials remains the same throughout for all PC’s:-
Username:- IUSR_METRO
Password:- P3rfoRm@1nce


3.  In start menu, navigate till HP Software à PC host à Tools à Agent run time setting configurations à select radio button of Manual log on to this machine

Hopefully, now, you can run the test from performance center or controller :)

Stay tuned for more posts!!!

Load Runner Script Development Framework


In general, for any project, we design n number of scripts, create test data and executes them. However, during tight project schedules, we do not have sufficient time to create the test data, implement common logic across all scripts like error handing, print to file, creating additional attributes for environment variables etc. 

So, we have come up with an approach of placing all the common functions/user actions/custom code within a single header file thereby making the scripts dynamic and less complex. Moreover , we'll also share the list of functions that would be used for fetching the records directly from database and using them within the LR scripts without maintaining any parameter file or flat files.

Advantage of having this common header file

  • Easy maintenance of the scripts with less manual intervention
  • Effective debugging at functional level
  • Easy to port to different environments
  • Write/Update once and reflect everywhere

To understand the framework, here is a case where we have placed the commonly used actions and the query to fetch the records from the database (like Payment ID) within the CommonActions.h file (header file). The script specific actions are kept within the LR scripts, and those are executed from the script itself. 


In addition to that, there will be cases where we need to execute tests in multiple test environments and these tests has to be triggered one after another. Given the minimal time gap between each test, the best way is to have them in one centralized location and call it from our script. In this way, we can make debugging easy and make changes at one place that will reflect in all the scripts.

Commonly used functions for fetching the records from database-

1.  lr_db_connect - establishes a connection with the database
2.  lr_db_executeSQLStatement - Oracle/SQL queries are written within this function 
3.  lr_db_getValue - fetches a value from the dataset
4.  lr_db_disconnect - disconnect the connection from database

Stay tuned for more posts!!!