Test plan: Consists
of series of steps that the end user is trying to perform, and jmeter will
reproduce the same with virtual users. Test plan contains one or more thread
groups, logic controllers, listners,
assertions, timers etc. Below snapshot represents the structure for adding the
elements to the test plan:

Workbench: Provides temporary storage for the elements, the elements
that are added to the workbench are used for the recording purpose.

Note: Test
Plan is also known as permanent storage because the elements which are added to
the test plan are saved permanently and can be accessed anytime in future
whereas workbench provides temporary storage, elements added to it will be
vanished once the script is closed.
Thread group: The first step is to add the thread group to the test plan, all the
elements such as logic controllers, sampler, timers etc. are added under the
thread group, so consider the thread group
as a parent and it’s elements as child. Following items are controlled
using thread group:
- Assigning number of users for executions
- Setting up the ramp up time
- Controlling the loop count so as to run the script for specific number of iterations
- Setting up the duration of the test
How to add thread
group:
Right Click Test Plan àAdd
à
Threads (User) à Thread group

Transaction
controller: Contains the user actions performed during the recording phase.
When the script is recorded, it captures the traffic in the form of http
requests, so these requests are placed within individual transaction
controllers.
Let’s say, you hit the home page www.blazedemo.com
, requests corresponding to the homepage transaction will be placed inside home
page transaction, followed by clicking on find flights, so corresponding
requests would be placed inside another transaction named ClickFindFlights. Likewise you can have multiple transactions based
on the scenario.
How to add
transaction controller:
Right click Thread group àAdd àLogic Controller àTransaction controller


Follow step 1 and step 2 for recording other transactions as well


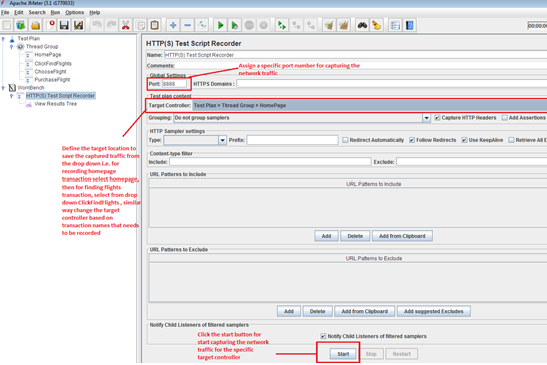
HTTP(S) Test Script
Recorder: In order to capture the network traffic for your scenario, add
this element inside work bench and define the port number for which it will
capture the traffic and the same port number should be assigned to the browser
proxy settings as well
At browser level, change the proxy settings: Browser àSettings
àProxy
After completing the above settings, you are good to start
the script recording.
Step 1: Change the target controller to point to HomePage
transaction
Steps 2: Enter www.blazedemo.com in the browser
On the left, we have selected HomePage as target controller
and on the right the recording events are captured in the home page transaction
controller. So whatever you will be navigating in the browser you will be able
to capture it within transaction controller
Follow step 1 and step 2 for recording other transactions as well
Step 1: Change Target Controller to Click Find Flights
Step 2: In Browser, Click the Find flights button
On the left, we have selected ClickFindFlights as target
controller and on the right the recorded events are captured in the
ClickFindFlights transaction controller
Same way you can record the other transactions as well and
after recording the entire scenario, the test plan would look like:-

While doing a performance test, we generally omit out .css/.js/.ico/jpeg/.png
files, so can comment out those requests from our script based on the
requirement
Next step will be the parameterization:
Parameterization: It’s a process of managing the user input
in order to facilitate it for multiple users or iterations.
So, you need to find the values which were entered by the
end user in the application. Such as on the first page, the user selected the
departure and the destination city.
Now you have to parameterize the city. For this, you will be
using 'CSV Data Set Config'.
Click on Thread
group-> Add->Config Element->CSV Data Set Config.
You need to place the CSV Data Set Config at the top of the
thread group. Next step will be to configure the CSV Data Set Config.
Filename: Enter
the .csv filename along with the entire file path, but, In case, the .csv file and the script are placed in
the same directory/path then you can directly give the csv file name. In this
case, we have placed both script and .csv file in the same directory so we have
just mentioned City.csv
Variable Names:
These are the reference for the values that are placed in the csv file. So, the
departure city will be referenced by p_DepartureCity and Destination city will
be referenced by p_DestinationCity
CSV Data Set Config
Element:
You can also correlate these cities but for now, you can
parameterize them. For parameterization, you have to create a csv file and need
to place the city names in it with comma
“,” as a delimiter
Now go to the parameter that has the static value in the
script and replace that parameter value with ${variable_name }
Same way, parameterization will be done for all other user
inputs across the script.
Stay tuned for more posts!!!
No comments:
Post a Comment